Using a custom setting in a node-locked license
LM-X License Manager lets you specify custom settings in your license file, allowing for extensive flexibility and increased pricing depth for your software offerings. A custom setting lets you base license checkouts on certain factors that exist at the user site during run time. A custom setting may be the number of CPU's on the client's machine, currently monitored users, current connections, or similar factors. This license model enables you to tailor licensing to your target customers and characteristics of your software.
For example, say you want to offer a discounted small business license that allows a maximum of 80 concurrent users. This means the custom setting, which we'll call USERCOUNT, cannot exceed a value of 80.
To base node-locked licensing on the custom USERCOUNT setting (example made in Windows environment):
- Start a new project in your IDE. Base your code on the example in LM-X root directory\examples\local\local.c.
- Include the LM-X library into your application (see the LM-X Quick Start Guide for more information).
- Generate a node-locked license file using xmllicgengui (for Windows only; use xmlilicgen for other platforms), located in LM-X root directory\platform-specific directory, for example, C:\LM-X\Win32_x86.
- Using the OPTIONS setting, specify the custom parameter that the license will be limited to, in our example, "USERCOUNT=80" (you may use a different syntax such as "PARAM1=text1,text2,text3 PARAM2=value"). An example of the feature settings for this node-locked license are shown in the following screenshot.
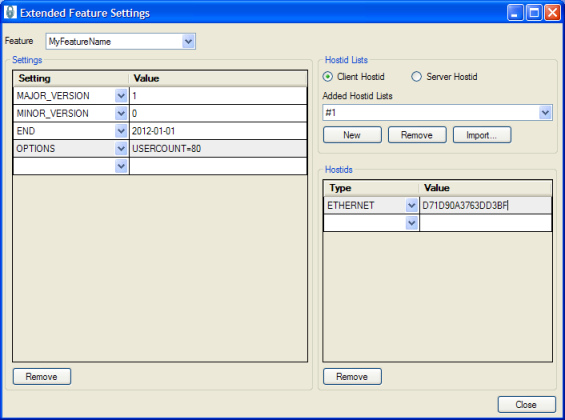
An example XML template for this node-locked license looks like the following:‹?xml version="1.0" encoding="utf-8"?› ‹LICENSEFILE› ‹FEATURE NAME="MyFeatureName"› ‹SETTING MAJOR_VERSION="1" /› ‹SETTING MINOR_VERSION="0" /› ‹SETTING END="2012-01-01" /› ‹SETTING OPTIONS="USERCOUNT=80" /› ‹CLIENT_HOSTID› ‹SETTING ETHERNET="D71D90A3763DD3BF" /› ‹/CLIENT_HOSTID› ‹/FEATURE› ‹/LICENSEFILE›
You may create multiple templates that use such a custom setting. For example, you might have a template called "Small Business" with USERCOUNT=80, another called "Corporate" with USERCOUNT=200, etc. When the end-user upgrades the license from Small Business to Corporate, all you need to do is ship a new license file. (Note that this example also includes additional security features: the HOSTID setting, which provides copy protection by allowing end-users to run the application on only one machine, and an expiration date.) - In your code (based on the local.c example), access the license setting OPTIONS "USERCOUNT=80" using FI.szOptions, which is available after calling LMX_GetFeatureInfo(LmxHandle, LMX_GetFeatureChecksum("MyFeatureName")).
Retrieve the integer from string FI.szOptions and compare it with the actual value in your application. If the comparison does not match your limitation, you can force the program to exit (remember to use LMX_Free(LmxHandle) upon exit to free allocated memory). Otherwise, license restrictions are fulfilled and you can continue. Repeat the comparison whenever your parameter may change. - Compile and run your application to check how it works.
The information about your custom parameter is encrypted in the license key and, by default, is visible in the license file. If you don't want the custom parameter displayed in the license file, use the KEYCOMMENT setting instead of the OPTIONS setting.