The information on this page refers to License Statistics v7.0 and newer, which added the ability to have multiple dashboards and introduced dashboard management features. If you are using a version previous to v7.0, see documentation for previous versions. |
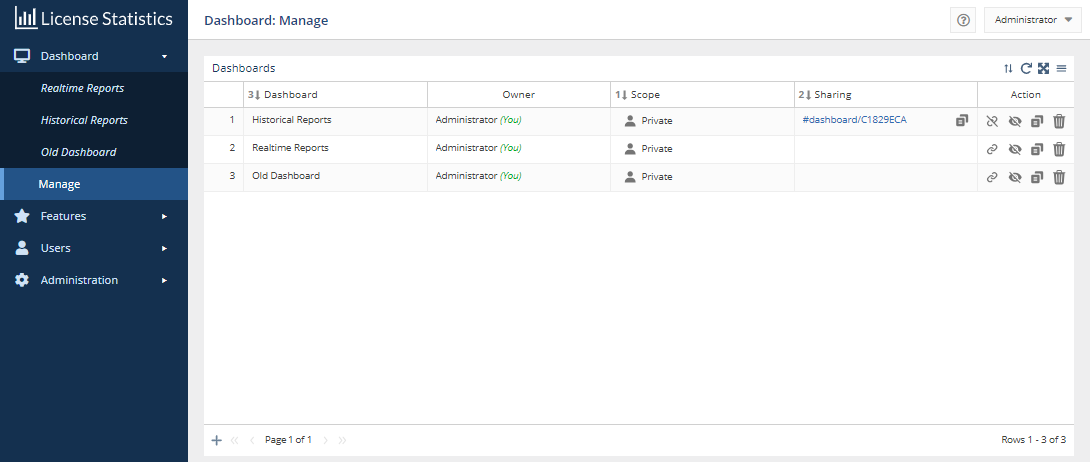
The Manage option under Dashboards opens a page that lets manage your dashboards.
You can use the Dashboard: Manage page to:
- Control private/public access to dashboards
- Share dashboards with others
- Clone existing dashboards
- Remove dashboards
Each of these capabilities is described below.
Controlling private/public access to dashboards (scope)
Dashboards can be either private (the default) or public. Private dashboards can be seen only by your user. You can make your dashboards public to allow other users to see them. Public dashboards are viewable in read-only mode by all other License Statistics users.
You can switch the Private/Public scope of a dashboard at any time. To switch the scope of a dashboard between Private and Public, click in the Scope cell of the dashboard you want to change the scope for. A confirmation message for switching the scope will appear; for example:
Click OK to confirm the scope switch.
The Owner column of the Dashboards list shows the owner of any dashboards that have been shared with you (or indicates that you are the owner of the dashboard).
Sharing dashboards with others
You can allow individual users to view a dashboard by creating a shareable link. The link will provide read-only access to the dashboard in full-screen mode without further authorization. The shareable link can be created for either private or public dashboards, and give you an easy way to share dashboards with other users.
To create a shareable link to a dashboard, click the Link icon in the Action column for the dashboard row you want to link to. A popup message will verify that the action has taken place, and the link will be automatically created and appear in the Sharing column for the dashboard (as seen for the first row in the Dashboards list in the illustration above).
You can click the link to access the read-only dashboard from the Manage page, or you can copy the link and send it to others as needed.
Cloning existing dashboards
You can clone (copy) an existing public or private dashboard by clicking the Clone icon in the Action. A popup message will verify that the action has taken place, and the new dashboard will be added to the list
All cloned dashboards are initially created as a private copy of the dashboard. Cloned dashboards are named <original_dashboard_name> - Copy by default. You can change the name by clicking in the Dashboard column for the copied dashboard and typing the new name.
Deleting dashboards
- Scope: Private (default) or Public (limited to read-only by other users) – click in cell to see prompt to switch scope
- Sharing (read only, but available as a full screen without authorization) – a link is created in the row for that dashboard; can click or copy and share as needed
Renaming dashboards
You can change a dashboard name at any time by clicking in the Dashboard column for the dashboard and typing the new name. You can use any name that helps you to identify the dashboard. Dashboard names do not need to be unique.

