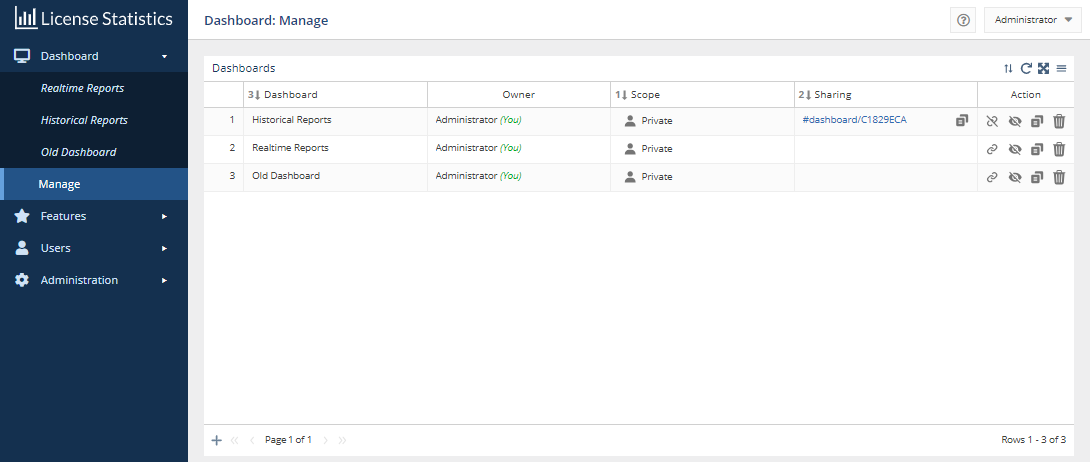
The information on this page refers to License Statistics v7.0 and newer, which added the ability to have multiple dashboards and introduced dashboard management features. If you are using a version previous to v7.0, see documentation for previous versions. |
The Dashboard button at the top of the Dashboard page opens the Manage Dashboards page.

You can use the Manage Dashboards page to:
Using the Manage Dashboards page is described in the sections below.
Dashboards can have a scope of either private (the default) or public.
When you open a dashboard, the scope is indicated at the top of the page, as shown in the illustration below for a public dashboard.

To switch the scope of a dashboard that you own between Private and Public:


You can allow individuals to view a public or private dashboard that you own by creating a shareable link to the dashboard. The link provides read-only access to the dashboard without requiring logging into License Statistics. Shareable links give you an easy way to make dashboards viewable by others, even if they are not License Statistics users. For example, you may want to share a dashboard that contains reports of interest to team members who do not have access to License Statistics.
You must be the owner of the dashboard to create a link to it. If the dashboard is public, the link will not be visible in other users' Manage Dashboards page, and the Link icon in the dashboard's Action column will be inactive.
To create a shareable link to a dashboard, click the Link icon in the Action column for the dashboard row you want to create a link to.
A popup message will verify that the action has taken place, and the link will be automatically created and appear in the Sharing column for the dashboard (as seen for the first row in the Dashboards list in the illustration above).
After creating the shareable link:
You can clone (copy) an existing public or private dashboard by clicking the Clone icon in the Action column. A popup message will verify that the action has taken place, and the new dashboard will be added to your Dashboards list.
All cloned dashboards are created as a private copy of the dashboard, owned by the user who cloned it. You can adjust the settings of your cloned dashboards in the same way as any other dashboards you own. Cloned dashboards are named "<original_dashboard_name> - Copy" by default. You can change the name as described below in Renaming dashboards.
To delete a dashboard, click the Delete icon in the Action column for the dashboard you want to delete. A popup message will verify that the action has taken place, and the dashboard will be deleted.
Only the owner of the dashboard is able to delete it; if the dashboard is public, the Delete icon in the Action column is inactive.
You can toggle visibility of individual dashboards in your Dashboard menu, so the menu contains only those dashboards you're actively using. For example, several dashboards may be public and appear in your Dashboards list. You can toggle menu visibility on for only those public dashboards you use.
By default, dashboards are not shown in the Dashboard menu; they are only listed in the Manage: Dashboard page's Dashboards list. For example, if you clone a dashboard, it will appear in your Dashboards list, but you will not see it in the Dashboard menu. Likewise, if a user makes a dashboard public, other users will see the dashboard in their Manage: Dashboard page, but will not see the dashboard in their Dashboard menu.
Public dashboards are listed in all users' Manage: Dashboard page, but they are not viewable in the Dashboard menu by default.
Removing a dashboard only prevents that dashboard from displaying in the Dashboard menu; it will not delete the dashboard. A public dashboard can be removed from the Dashboards menu by any user (but can be deleted only by the dashboard owner).
To remove a dashboard from the Dashboard menu, click the Remove icon in the Action list.
You can change a dashboard name at any time by clicking in the Dashboard column for the dashboard and typing the new name.