The information on this page refers to License Statistics v6.22 and newer, which introduced using account "roles" to control permissible/forbidden license servers and reports, and separated the ability to hide/show license servers and reports to settings that are applied to individual user accounts. If you are using a version previous to v6.22, see documentation for previous versions. |
License Statistics Administrators can create and edit user accounts using the Accounts page, found under the Administration section in the navigation menu.

From the Accounts page, you can:
- Manually create user accounts
- Edit account and role settings
- Create custom roles that control user account permissions
- Edit accounts and roles
- Delete user accounts and roles
- Enable/disable authentication
| Note |
|---|
You can also create user accounts automatically using LDAP, as described in Connecting to an LDAP server. |
About permission and visibility settings
Permission settings provide security against unauthorized access to license servers and/or reports by individual user accounts. Permissions for user accounts are controlled using roles. The permissible license servers and reports that each user account is allowed to access are defined by the role that is assigned to the user. Individual users cannot alter their permission settings.
The visibility of permissible license servers and individual features may also optionally be set by a License Statistics administrator when creating or editing individual user accounts. In addition, any License Statistics user can change the visibility settings for license servers and features at any time, allowing individual users to view only the data that is relevant for their needs in License Statistics reports.
Anchor create user create user
Creating a new account
| create user | |
| create user |
To access user management functions, click Administration at the top of the License Statistics web page to access the User Management tab. (Note: You must have License Statistics administrator privileges to use the user management features of License Statistics. If you do not have administrator privileges, you will not see an Administration link at the top of the License Statistics web page.)
From the User Management tab, you can enable automatic user account creation, manually create new users, edit user account details, and delete user accounts, as described below. You can also enable/disable authentication from this page.
For information about creating user accounts automatically using LDAP, see Automating user account creation using LDAP.
...
To add a License Statistics user account:
- In the Administration pageAccounts page, click Create New User to open the Create New User dialog: Under the General tab: the Create button below the Accounts table.

The Create Account wizard displays, with the General tab open.
Note Initially, you must proceed through the tabs by using the Next button after filling in the required information in the tab. As you proceed through each tab of the dialog, you will be able to directly open the tabs and change settings as needed.
- In the General tab, complete the settings as appropriate for the account you are adding:
- The Display Name (usually, the first and last name of the user) that will be shown in License Statistics.
- The Name (username) that will be used to log in to License Statistics.
- Optionally, an email address for the account.
- The role to be assigned to the account, which controls the user's permission settings. The account will have access only to the permitted servers and reports according to the assigned role; access to all other license servers and reports will be forbidden. See Assigning and adding roles for more information about roles.
Anchor #LDAPtoggle #LDAPtoggle - Complete the user and password information.
- If desired, give the user a different name that will display as the logged in user name. (For example, the admin user displays as "Administrator" in the "Logged in as:" area in the upper right of the page.)
- Assign either Administrator or User role to the user. License Statistics Administrators have the ability to create new users, edit license server information, and remove license servers from the list of monitored servers. License Statistics Users may only view the usage information and do not have any editing privileges.
- If you have enabled LDAP, you can check the "Authenticate through using LDAP" option to authenticate the user name username using LDAP instead of a password. Also see the notes below regarding LDAP.
- If you use are not using LDAP authentication, you do not enter the password for the user. (Also see the notes below regarding LDAP.)
- Under the Permissions tab, select whether the user will be allowed to control the visibility of his or her own license servers and features. This setting affects only the user's own visibility settings and will not affect other users.
- Under the Visible License Servers and Visible Features tabs, specify which license servers and features the user will be allowed to see by selecting the license servers/features and clicking the Hide/Show buttons as applicable.
...
Notes on LDAP
...
- account, and then re-enter the password to confirm it. (If you toggle on LDAP authentication as described in the previous step, the password fields will be grayed out.)
- account, and then re-enter the password to confirm it. (If you toggle on LDAP authentication as described in the previous step, the password fields will be grayed out.)
- Click Next (which is available only after you have completed all required fields) to continue to the License Server Visibility tab.
This tab lets you optionally customize which license servers (permissible license servers are based on the role that was selected for the account) will be shown in License Statistics reports for the account. For example, you may anticipate that a certain license server is unlikely to be monitored by a particular account, and thus will not need to be seen in reports, but you may not want to forbid the account from accessing that license server. Account users can change the visibility settings for their permissible license servers at any time, as described in Visibility settings.
- To customize license server visibility for the account, select the license server(s) you want to move between the "Visible" and "Hidden" lists, and then click the Hide/Show button as needed.
- Click Next to continue to the Feature Visibility tab.
This tab lets you optionally customize which features will be shown in the License Statistics reports that are permissible for the role assigned to the account. For example, you may anticipate that a certain feature is unlikely to be monitored by a particular account, and thus will not need to be seen in reports. Account users can change their visibility settings for features at any time, as described in Visibility settings.
- Select a license server from the Select License Server drop-down at the top of the page to see the visible and hidden features for that license server. The list of license servers is limited to the permissible license servers for the account (based on the role that was selected for the account).
- To customize feature visibility for the account, select the feature(s) you want to move between the "Visible" and "Hidden" lists, and then click the Hide/Show buttons as needed.
- Repeat steps 6 and 7 as needed to set the feature visibility for the license servers that are permissible for the account.
- Click Save to create the account.
Notes on using LDAP authenticationAnchor LDAP LDAP
- LDAP must be enabled to use the "Authenticate using LDAP" toggle on the Accounts page. If LDAP is disabled, the "Authenticate using LDAP" option will be disabled on the Accounts page.
- If the "Authenticate using LDAP" option is disabled, the
- If you enable LDAP and then subsequently disable LDAP, the user logins will fail. If you uncheck the Authenticate through LDAP option, the user credentials will be taken from the License Statistics database, or you may enter the account password in the Account form, as described above.
- If you toggle on the "Authenticate using LDAP" option to authenticate the username using LDAP, and then subsequently disable LDAP, the account logins will fail.
- The administrator login that is initially created by License Statistics (username: admin) cannot use LDAP authentication.
- For more information on using LDAP for user authentication, see Connecting to an LDAP server and Automating user account creation using LDAP.
Editing a user
To edit a user's details:
- Click the Edit icon in the Actions column for that user.
- In the Edit User dialog, edit the user's details as needed, and click Submit to make the changes.
Note: If the Authenticate through LDAP option was checked and you uncheck it, the user credentials will be taken from the License Statistics database.
For more information on using LDAP for user authentication, see Connecting to an LDAP server and Automating user account creation using LDAP.
Deleting a user
...
Anchor roles roles
Assigning and adding roles
| roles | |
| roles |
License Statistics user permissions are controlled by the role that is assigned to the account. There are two default roles, described in the table below. These default roles cannot be deleted, and the role name cannot be changed.
| Default role | Permission settings and usage | Permission settings editable? |
|---|---|---|
| Administrator | Allows full permissions, including the ability to create new accounts, edit license server information, and remove license servers from the list of monitored servers. | No |
| User | Allows viewing usage information, but does not include any administrative or editing privileges. | Yes |
In addition to these default roles, you can add any number of custom roles that define the allowable license servers and reports that are accessible to users who are assigned that role. The settings for custom roles are initially based on the default "User" role.
To add a custom user role:
- In the Accounts page, click the Create button below the Roles table.

The Create Role wizard displays, with the General tab open.
Note Initially, you must proceed through the tabs by using the Next button after filling in the required information in the tab. As you proceed through each tab of the dialog, you will be able to directly open the tabs and change settings as needed.
- In the General tab, complete the settings as appropriate for the role you are adding:
- The role name, which will be used to identify the role when adding/editing accounts.
- Optionally, a description for the role.
- If desired, enable the "Allow New License Servers" toggle to automatically allow new license servers that are added to License Statistics to be added to the role's permitted license servers.
- Click Next (which is available only after you have completed all required fields) to continue to the License Server Permissions tab, which lists the permissible license servers for the role.

- Specify the license servers that are permissible for the role by selecting the license server(s) you want to move between the "Allowed License Servers" and "Forbidden License Servers" lists, and then clicking the Forbid/Allow buttons as needed.
- Click Next to continue to the Report Permissions tab.

- Click Save to create the account.
| Note |
|---|
As of License Statistics v6.22:
|
Anchor edit role edit role
Editing an account or role
| edit role | |
| edit role |
You can edit any account except the Administrator account. Any changes to role permissions will be applied instantly, and will be seen in License Statistics menus and grids after the next page/grid refresh.
To edit settings for an account or role:
- Click the Edit icon in the Action column for that account/role.
The Edit Account/Edit Role dialog opens. This dialog has the same tabs and content as the one used to create the account/role, with non-editable fields grayed out. - Edit the settings for the account/role as needed, in the same manner as for creating the account/role (see above).
- Click Save or Save and Close to accept the changes.
Anchor delete role delete role
Deleting an account or role
| delete role | |
| delete role |
You can delete user accounts or roles at any time. However, a role can be removed only when it is unused (not currently assigned to any user accounts).
To delete an account/role:
- Click the Delete icon in the Actions column for
...
- the account/role to be removed.
- Confirm the deletion of the account/role in the dialog that pops up.
Anchor auth auth
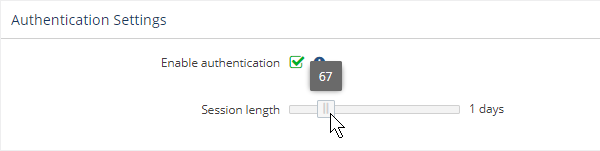
Enabling/disabling authentication
| auth | |
| auth |
User authentication Authentication is enabled by default and may be toggled on and off using the "Enable authentication" checkbox in the Authentication Settings area at the top of the User Management Accounts page.
When authentication is toggled onenabled, users must accounts must log in to access License Statistics. If authentication is toggled offdisabled, users everybody can access License Statistics without logging in. You might decide to turn off authentication if, for example, you provide your own method of security by allowing access to License Statistics only through your intranet.
After toggling authentication on/off, you must click Save to accept the change. If you have toggled If authentication is currently disabled, after toggling authentication on, you are will be returned to the Login page, where you must log in using a valid username/password in order to access License Statistics.
Use the "Session length" slider to set the number of days that the session will last after the account logs in. The session length defaults to 1 day and has a maximum of 365 days.
The session length you set is saved automatically.