| Some The information on this page refers to License Statistics v5v6. 1 or14 and newer, which added the capability to connect to an LDAP server over SSL protocolintroduced schema settings and expanded LDAP support to include LDAP and LDAPwith POSIX, as well as providing support for custom LDAP configuration. If you are using an earlier version of License Statistics, see v4.18 to v5.1 documentation or refer to documentation for versions prior to v4.18. |
License Statistics lets you connect to an LDAP server to access user accounts (see Automating user account creation using LDAP) and user groups you have defined in an LDAP directory (see Importing LDAP user groups).
Currently, License Statistics has been tested only with Microsoft Active Directory. You may use other LDAP directories, but they are untested with License Statistics at this time. The following instructions for setting up LDAP apply to Active Directory, but may be used as a basis for connecting to other LDAP directories.
To set up connection to LDAP:
...
a version previous to v6.14, see documentation for previous versions. |
To access LDAP configuration settings, select LDAP under the Administration section. (This page is visible only for License Statistics administrator users.)
...
The following sections describe how to configure LDAP using the configuration page. Also see Importing LDAP user groups for more details on this topic.
Setting up a connection to LDAP
To set up a connection to LDAP, in the General section of the LDAP configuration page:
...
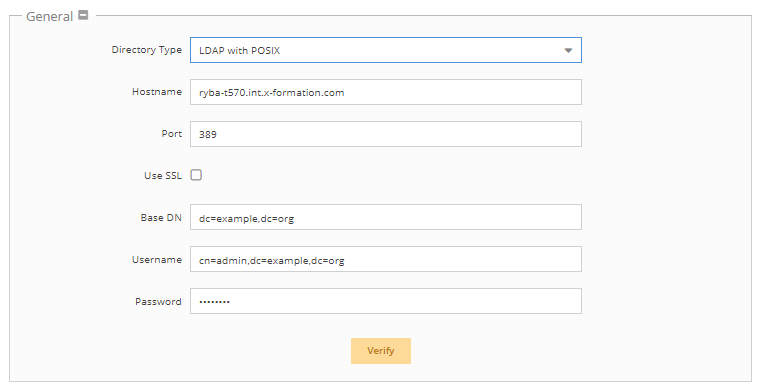
- Enter the appropriate information for connecting to your LDAP server. An example setup is shown in the screenshot below. Also see the following section, LDAP settings, for more information.
- Directory type: Select from Active Directory (default), LDAP, or LDAP with POSIX. Your selection will populate the schema settings with the defaults for that selection, which can then be customized if needed.
- Hostame
- LDAP Host: The hostname of the LDAP server.
- Port: The port for the LDAP server. The default is 389.
- Use SSL: Check this box if you would like to connect to your LDAP server over SSL protocol. If using SSL, see Enabling LDAP over SSL for further setup information.
- Base DN: The base DN (Distinguished Name) under which to search for users and groups. (See Testing LDAP settings , below, for more information on obtaining the base DN.)
- Manager DN: The DN for the manager account to be used for initial binding (authentication).
- Manager Password: The password for the manager account.
- Account Domain Name: The sub-domain of the LDAP directory.
- Click Verify to ensure that your connection to the LDAP server works as expected. A message will indicate whether the test was successful. If the test is not successful, make the needed changes to the setup, save the changes, and retest the connection. (See Testing LDAP settings for more information on verifying your LDAP settings.)
- Click Save at the bottom of the LDAP page to save the LDAP configuration.
Anchor enableLDAPImport enableLDAPImport
Enabling LDAP import
| enableLDAPImport | |
| enableLDAPImport |
License Statistics lets you import user details and groups you have defined in an LDAP directory. Importing your user groups from LDAP eliminates the need to create user groups manually, which can be time consuming if you have a large number of users. For more information, see Importing LDAP user groups.
To enable LDAP import:
- Check the "Enable LDAP Users Import" checkbox to enable importing user groups you have defined in an LDAP directory.
- Save your settingsOptionally, you may enter a filter for the import to limit the data that is imported.
- Enter a valid username and password in the Test connection area and click /edit the schema settings if needed for your configuration.
- Click Verify to ensure that your connection to the LDAP server works as expected. A message will indicate whether the test was successful. If the test is not successful, make the needed changes to the setup, save the changes, and retest the connection.

Enabling LDAP over SSL
By default, LDAP traffic is transmitted unsecured. You can, however, make LDAP traffic confidential by installing a valid certificate issued by a certificate authority (CA). The CA certificate, which contains a public key and the identity of the owner, is needed to enable encrypted communication between License Statistics and your LDAP server.
To connect over SSL:
If you want to verify that the LDAP server's certificate is properly signed:
- Set the variable LDAP_SSL_CERTIFICATE_KEY_FILE in the License Statistics configuration file (xflicstat.cfg). This variable defines the path and filename of the CA certificate and allows the client to verify the LDAP server's certificate.
- Leave the default settings of the variable LDAP_SSL_CERTIFICATE_VERIFY. By default, this variable is set to the "demand" value, indicating that the server certificate will be checked to verify that it is properly signed and your CA certificate, which you set in LDAP_SSL_CERTIFICATE_KEY_FILE variable, will be used to verify that.
- Restart License Statistics.
If you do not want to verify that the LDAP server's certificate is properly signed:
- Set the variable LDAP_SSL_CERTIFICATE_VERIFY to "allow". This way, the connection will be allowed even if it turns out that the certificate is missing or it is not valid. In this case, setting the variable LDAP_SSL_CERTIFICATE_KEY_FILE is not obligatory.
- Restart License Statistics.
Note: We recommend using the predefined settings and leaving the variable LDAP_SSL_CERTIFICATE_VERIFY set to "demand" so you can perform the validation of the LDAP server's certificate using your CA file.
LDAP settings
A tool such as JXplorer is an excellent way to test your LDAP settings. Using such a tool can save a lot of time when configuring License Statistics, because you can test that credentials and other settings are correct.
You can use JXplorer to copy the DN from LDAP. To do this:
...
- Click Save at the bottom of the LDAP page to save the LDAP configuration.
| Info |
|---|
Note that not all users matching the Base DN will be imported, but only those that were already monitored by License Statistics. Also, a group will be imported from LDAP only if it contains at least one user that is monitored by License Statistics. Example: Say you have the following users and groups in your configuration:
Given this scenario, License Statistics will import:
License Statistics will not import:
|
Anchor autoAcctCreationLDAP autoAcctCreationLDAP
Enabling LDAP authentication
| autoAcctCreationLDAP | |
| autoAcctCreationLDAP |
You can enable License Statistics user authentication and optionally allow for automated License Statistics user account creation using the user accounts you already have defined in an LDAP directory.
Enabling account creation using LDAP eliminates the potentially time-consuming task of adding users manually in License Statistics. With the LDAP option enabled, users simply log into License Statistics using their username and password that is stored in Active Directory, regardless whether the user has an account in License Statistics.
If LDAP authentication is enabled, you can also use LDAP authentication when creating new users.
To enable user authentication using LDAP:
- Check the "Enable LDAP Authentication" checkbox.
Optionally, you can enter a filter that limits the accounts that are allowed to authenticate and are automatically created.
Info Default query with empty optional filter and username foo:
Code Block &(objectClass=user)(sAMAccountName=foo)Query with optional field applied (filter value: memberOf=admin) and username bar:
Code Block &(&(objectClass=user)(sAMAccountName=bar))(memberOf=admin)Optionally, check the "Enable automatic account creation using LDAP" checkbox if you want to automatically create accounts using LDAP.
Info If "Enable LDAP Authentication" is selected and "Enable automatic account creation using LDAP" is not selected (which is the default), all users that have accounts connected to LDAP will be authenticated, but no new accounts will be created, even if the LDAP credentials are valid.
Similarly, if you disable LDAP authentication, users who have already logged into License Statistics using their Active Directory will retain the ability to use their login, but no new login attempts using LDAP user accounts will be possible.
- Enter/edit the schema settings if needed for your configuration.
- Click Verify to ensure that your connection to the LDAP server works as expected. A message will indicate whether the test was successful. If the test is not successful, make the needed changes to the setup, save the changes, and retest the connection.
- Click Save at the bottom of the LDAP page to save the LDAP configuration
3. After copying the base DN, you can simply paste the string into License Statistic's Base DN field instead of typing it.
...
- .