Using a custom setting in a node-locked license
LM-X License Manager lets you specify custom settings in your license file, allowing for extensive flexibility and increased pricing depth for your software offerings. A custom setting lets you base license checkouts on certain factors that exist at the user site during run time. A custom setting may be the number of CPU's on the client's machine, currently monitored users, current connections, or similar factors. This license model enables you to tailor licensing to your target customers and characteristics of your software.
For example, say you want to offer a discounted small business license that allows a maximum of 80 concurrent users. This means the custom setting, which we'll call USERCOUNT, cannot exceed a value of 80.
To base node-locked licensing on the custom USERCOUNT setting (example made in Windows environment):
- Start a new project in your IDE. Base your code on the example in LM-X root directory\examples\local\local.c.
- Include the LM-X library into your application (see the LM-X Quick Start Guide for more information).
- Generate a node-locked license file using xmllicgengui (for Windows only; use xmlilicgen for other platforms), located in LM-X root directory\platform-specific directory, for example, C:\LM-X\Win32_x86.
Using the OPTIONS setting, specify the custom parameter that the license will be limited to, in our example, "USERCOUNT=80" (you may use a different syntax such as "PARAM1=text1,text2,text3 PARAM2=value"). An example of the feature settings for this node-locked license are shown in the following screenshot.
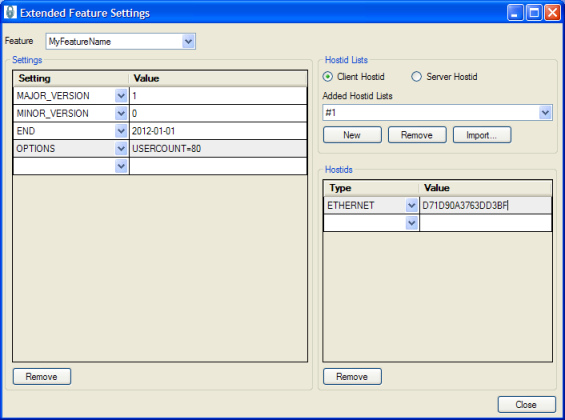
An example XML template for this node-locked license looks like the following:‹?xml version="1.0" encoding="utf-8"?› ‹LICENSEFILE› ‹FEATURE NAME="MyFeatureName"› ‹SETTING MAJOR_VERSION="1" /› ‹SETTING MINOR_VERSION="0" /› ‹SETTING END="2012-01-01" /› ‹SETTING OPTIONS="USERCOUNT=80" /› ‹CLIENT_HOSTID› ‹SETTING ETHERNET="D71D90A3763DD3BF" /› ‹/CLIENT_HOSTID› ‹/FEATURE› ‹/LICENSEFILE›
You may create multiple templates that use such a custom setting. For example, you might have a template called "Small Business" with USERCOUNT=80, another called "Corporate" with USERCOUNT=200, etc. When the end-user upgrades the license from Small Business to Corporate, all you need to do is ship a new license file. (Note that this example also includes additional security features: the HOSTID setting, which provides copy protection by allowing end-users to run the application on only one machine, and an expiration date.)
- In your code (based on the local.c example), access the license setting OPTIONS "USERCOUNT=80" using FI.szOptions, which is available after calling LMX_GetFeatureInfo(LmxHandle, "MyFeatureName")).
Retrieve the integer from string FI.szOptions and compare it with the actual value in your application. If the comparison does not match your limitation, you can force the program to exit (remember to use LMX_Free(LmxHandle) upon exit to free allocated memory). Otherwise, license restrictions are fulfilled and you can continue. Repeat the comparison whenever your parameter may change. - Compile and run your application to check how it works.
The information about your custom parameter is encrypted in the license key and, by default, is visible in the license file. If you don't want the custom parameter displayed in the license file, use the KEYCOMMENT setting instead of the OPTIONS setting.
Using a custom setting in a floating license
LM-X License Manager lets you specify custom settings in your license file, allowing for extensive flexibility and increased pricing depth for your software offerings. A custom setting lets you base license checkouts on certain factors that exist at the user site during run time. A custom setting may be the number of CPU's on the client's machine, currently monitored users, current connections, or similar factors. This license model enables you to tailor licensing to your target customers and characteristics of your software.
For example, say you want to offer a discounted small business license that allows a maximum of 80 concurrent users. This means the custom setting, which we'll call USERCOUNT, cannot exceed a value of 80.
To base floating licensing on the custom USERCOUNT setting (example made in Windows environment):
- Start a new project in your IDE. Base your code on the example in LM-X root directory\examples\network\network.c.
- Include the LM-X library into your application (see the LM-X Quick Start Guide for more information).
Generate a floating license file using xmllicgengui (for Windows only; use xmlilicgen for other platforms), located in LM-X root directory\platform-specific directory; for example, C:\LM-X\Win32_x86. The settings for the floating license are shown in the following screenshot:
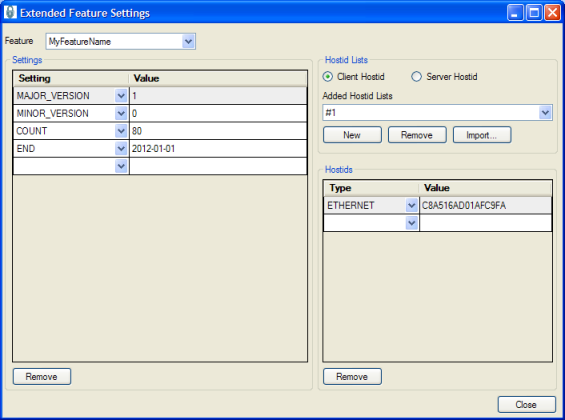
An example XML template for a floating license looks like the following:‹?xml version="1.0" encoding="utf-8"?› ‹LICENSEFILE› ‹SETTING END="2012-01-01" /› ‹FEATURE NAME="MyFeatureName" /› ‹SETTING MAJOR_VERSION="1" /› ‹SETTING MINOR_VERSION="0" /› ‹SETTING COUNT="80" /› ‹SERVER_HOSTID› ‹SETTING ETHERNET="C8A516AD01AFC9FA" /› ‹/SERVER_HOSTID› ‹/FEATURE› ‹/LICENSEFILE›
4. The following example assumes that your custom parameter in the application code is an integer called MyCustomParameter. To take the custom parameter into account in your code (based on network.c example), change the checkout parameter:
LMX_Checkout(LmxHandle, "MyFeatureName", 1, 0, 1)
to:LMX_Checkout(LmxHandle, "MyFeatureName", 1, 0, MyCustomParameter)
This will take into account the initial value of the custom parameter. We can also assume the custom parameter might change during the program runtime. For this reason, we'll define a variable called MyCustomParameterDifference, which will be the difference between the previous and current value. Whenever the custom parameter changes, the MyCustomParameterDifference value must be updated and LMX_Checkout or LMX_Checkin called depending on the negative or positive change. If the difference is positive we'll call:LMX_Checkout(LmxHandle, "MyFeatureName", 1, 0, MyCustomParameterDifference)
If the difference is negative we'll call:LMX_Checkin(LmxHandle, "MyFeatureName", ( (-1)*MyCustomParameterDifference) )
5.Compile your application. To check how it works, remember to start the license server (refer to the LM-X Quick Start Guide for more information).In the example illustrated above, the protected application takes a number of licenses from the license pool according to a parameter within your application. During the application runtime, it can take more licenses or release licenses according to the parameter changes.
Another licensing model where one application uses more than one license is token-based licensing. The primary use for token-based licensing is to let users purchase a number of features that each require one or more real licenses. This gives users a "pool" of licenses they can draw upon for license checkout requests, providing the flexibility to use various feature combinations as needed.
Using the license start date to improve protection against over-usage and clock tampering
You can set the starting date that your application is available for checkout by using the START setting in your XML license template file. By combining the START and END date settings (for example, <SETTING START="2010-09-01"/> and <SETTING END="2011-09-01"/>), you can specify the exact period of time that the license is active.
In this way, you can distribute the license far earlier than the start date without risk of over-usage. Setting the start date in a license you distribute earlier than the start date also helps you avoid any possible issues with users turning the clock back before their first use of the license. The system clock tampering will be detected immediately and the license will not be available for checkout until the clock is set to the proper date.
How to implement licensing for critical-use applications
LM-X License Manager provides two effective solutions that help with the reliability of license checkout for end users if you decide to use network licensing with an unstable network connection or with applications that are crucial to keep running.
Please refer to Implementing licensing for critical-use applications for more information.
How to use additive licenses
Adding licenses for software features that a customer buys later than the initial purchase of a license can be easily accomplished by using multiple additive licenses, which don’t require that you change the original license.
For details on using additive licenses, see KEYTYPE.
How do I provide license queuing to end users?
If you allow license queuing for your end users (it is enabled by default), you can test that if it works properly by taking the following steps:
- Enable queuing for Client A. (For information about enabling queuing, see Queuing licenses.
- Perform a checkout of the maximum number of available licenses from Client B. (This client does not have to have queuing enabled.)
- Attempt to checkout one or more licenses from a Client A. Client A should receive an LMX_QUEUE return status (that is, the value of LMX_STATUS returned by the unsuccessful LMX_Checkout operation) when trying to checkout a license, since all the licenses are used.
- Check one or more licenses from Client B. The checkout attempt from Client A should now be successful.
Note that you should call LMX_Checkout again to see if a license is available in the case that LMX_QUEUE is returned.
How to do custom comparison of hostids?
This tutorial describes how to do custom comparison of hostids. This is useful when you want to implement custom verification. For example, you can specify match rules that allow a license to succeed when 2 of 3 hostids are valid, rather than requiring strict 1:1 matching.
Start by setting a custom hostid function. This allows you to make custom hostids in license files with type HOSTID_CUSTOM:
LMX_SetOption(LmxHandle, LMX_OPT_CUSTOM_HOSTID_FUNCTION, (LMX_OPTION) MyHostid);
Next line lets you customize comparison of hostids in order to allow partial matching instead of 1:1 matching.
LMX_SetOption(LmxHandle, LMX_OPT_HOSTID_COMPARE_FUNCTION, (LMX_OPTION) HostidCompare);
MyHostid and HostidCompare functions must be implemented, obviousely:
LMX_STATUS LMX_CALLBACK MyHostid(LMX_HOSTID *pHostid, int *npHostids) {...}
LMX_STATUS LMX_CALLBACK HostidCompare(int nKeyHostidType, const LMX_HOSTID pLicenseHostid[], int nLicenseHostids, const LMX_HOSTID pSystemHostid[], int nSystemHostids) {...}
More detailed code example is available on request.
How to use the LM-X License Manager pay-per-use licensing model
The LM-X pay-per-use licensing model lets you bill your customers based on their actual usage of your software. To determine the usage, you ask the customer to write the usage information to a pay-per-use SQLite database each month (or other period) and send the database file to you. (You can find out more about SQLite, a free open source database, at http://www.sqlite.org/.)
Customers can also import pay-per-use databases into License Statistics to monitor their license usage.
To enable pay-per-use, the user must specify the database path in the USAGE_DATABASE entry in the license server configuration file (lmxserv.cfg). The user can also specify the detail level included in the pay-per-use data by editing the USAGE_LEVEL entry. Detailed information about these settings can be found in the LM-X End User Guide.
The database is authenticated. You can check for any tampering with the data by running the following command using the lmutil utility:
lmxendutil -readusagedb usage.db
Although you can check that the database contains valid data, accurate billing for pay per use is entirely dependent on the customer writing their usage data to the database. LM-X does not enforce the use of the pay-per-use database, so you should use pay per use only with customers who you trust to reliably report their usage information.
For more information about the Pay Per Use feature, see the Pay Per Use chapter in the LM-X End Users Guide. If you have further questions about this or other LM-X features, please contact X-Formation support.
Is it possible to simultaneously run several license servers from different vendors on the same host?
LM-X License Manager is designed to let you simultaneously run multiple instances of different license servers from different vendors on the same host. (Both license servers will share UDP port 6200. )
You should also ensure that each server runs on a unique TCP port.
Where can I download MinGW installers?
You can compile the LM-X SDK on a Windows machine using MinGW, a minimalist development environment for Microsoft Windows applications.
Click here to download MinGW for 32 and 64-bit Windows.
Why do I get a "software not allowed to run on terminal server client" error?
A "software not allowed to run on terminal server client" error indicates that the SHARE = TERMINALSERVER directive has not been included in the license file.